Kiwi Internet VoIP Portal – Please see below for an overview of the highlighted features. The rest are more advanced or not commonly used.
The VoIP portal is a GUI interface access for our customers. Our IP PBX server has the following call features (as per the picture as below):
To manage your Kiwi Internet VoIP settings go to http://voip.kiwiinternet.co.nz
- Username: Your phone number (including the area e.g. 09)
- Password: This would have been sent to you in the welcome e-mail.
Below is the main portal for all your VoIP phone settings
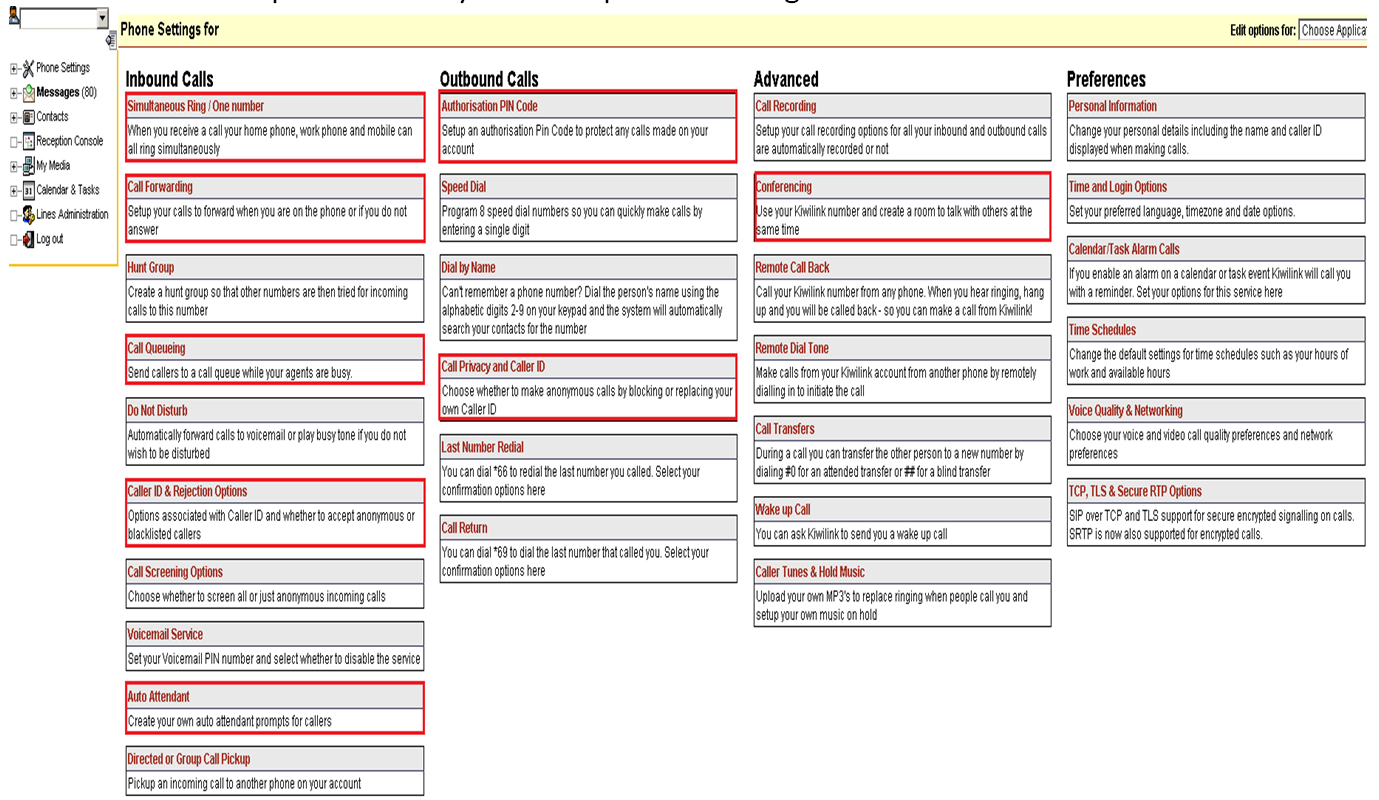
Simultaneous Ring / One Number:
- Enable Number 1: Line will ring simultaneously with entered number.
- Hunt Mode: Tick this box if you want the number to ignore any settings currently on the line (line you are forwarding to). Eg Voicemail, forwarding settings.
- Delay: Enter a value to represent seconds before initiating simultaneous ring, 0 by default indicates it will ring straight away.
- One Number: Tick this box if you want to enable ‘One Number’. This allows you to use your number on multiple devices eg a VoIP phone and smartphone (when configuring: please use a -1 after the number on the second device, -2 on third eg; 099294981-1)

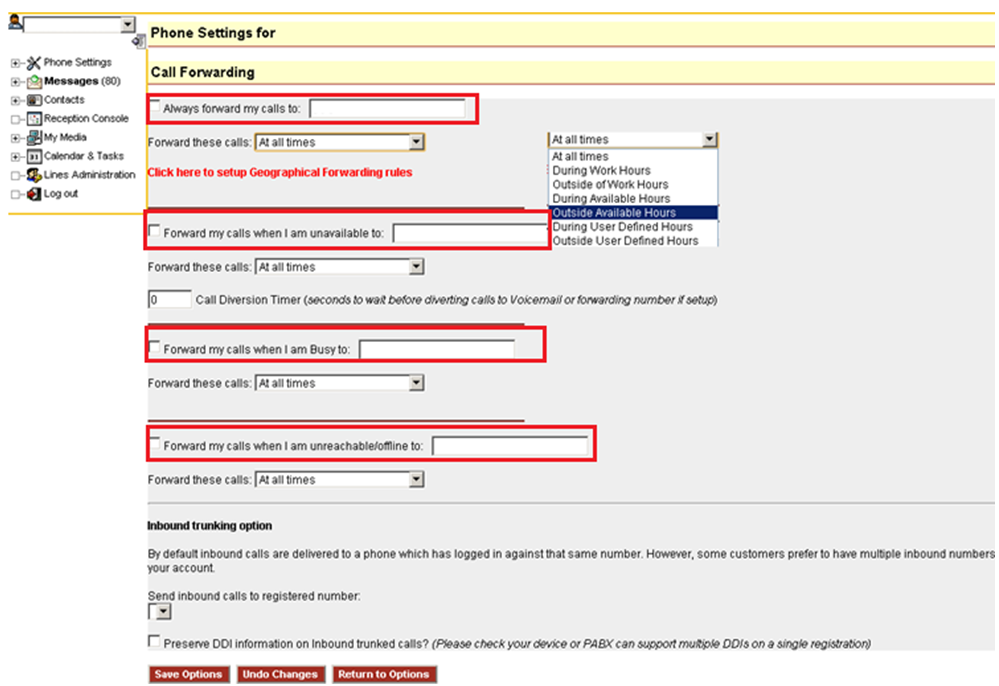
Call Forwarding:
- Always for my calls to: This is to set up a call forward to the input number, the drop down box allows you to choose when the forward is active. You can define these hours under the ‘time schedule’ from the main settings page.
- Forward my calls when unavailable: This will forward calls only when you are unavailable. When you don’t answer instead of going to a voicemail message it will forward the call to a different number.
- Forward my calls when busy: This will set up a forward for when you are currently already in a call.
- Forward my calls when unreachable/offline: This will only forward if your phone is not online, this is good for times when your internet connection drops.
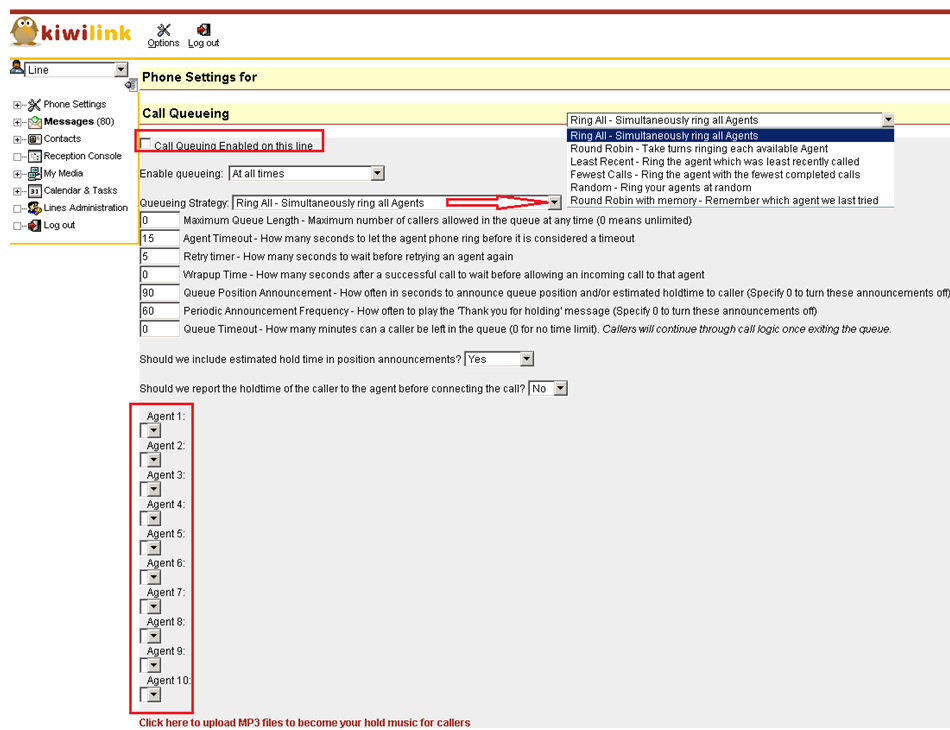
Call Queuing:
- Call Queuing enabled: Tick the box to enable call queuing.
- Call Queuing Strategy: Select the queuing method you would prefer.
- Values: Enter the preferred value for your queue.
- Agents: Click the dropdown box and select the numbers you wish to be included in the queue.
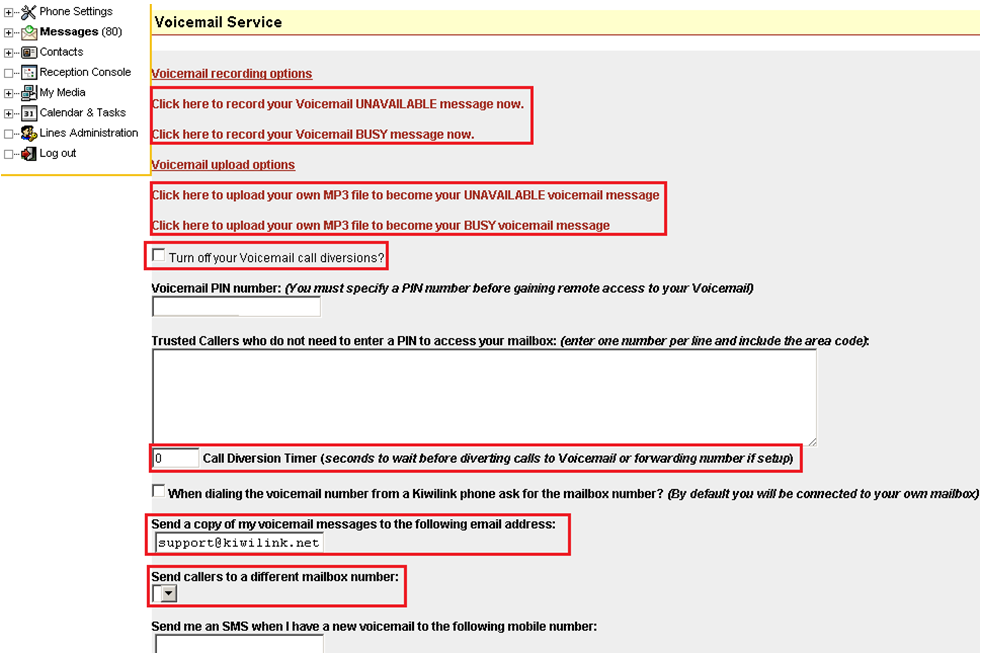
Voicemail Service:
- Click here to record your voicemail unavailable / busy message: Clicking this will bring up a box, enter a phone number and click ok. Our system will call that number prompting you to record your message.
- Click here to upload your voicemail unavailable / busy message: If you have your message recorded in MP3 click there and you will be prompted to upload the MP3.
- Turn off your Voicemail call diversions: Click here if you do not wish to use voicemail.
- Call diversion timer: Enter how many seconds to wait before diverting callers to voicemail.
- Send a copy of my voicemail to the following: If you wish to have you voicemail messages e-mailed to you enter an e-mail here.
How do I check my voicemail?
By Telephone – Dial *55 to access Voicemail Portal from your Kiwi Internet phone.
Online – Log into Kiwi Internet VoIP portal and select Messages from the menu. You can also have voicemails forwarded to an email address of your choice – configure this in the Voicemail Service option in your Kiwi Internet Settings screen. Messages will be sent as .wav attachments to the email and will normally play in Windows Media Player or similar software.
How do I setup voicemail settings?
Simply Dial *55 from your Kiwi Internet phone and then after listening to any new messages you may have, press ‘0′ to access your greetings settings.
Once you press ‘0′ to access your voicemail greetings settings then you can select:
- ‘1′ – To setup your unavailable message
- ‘2′ – To setup your busy message
- ‘3′ – To setup your name
- ‘4′ – To setup a temporary greeting (i.e. on vacation for a while)
- ‘5′ – To change your PIN number (instead of using the Kiwi Internet VoIP portal)
Press ‘#’ after recording and follow the prompts to listen to the recording and save it.
There are lots of things you can do in your voicemail box such as navigate messages, change folders, move messages between folders, forward messages, play back message details, return a call, place a new outgoing call and more…
Menu when not listening to messages:
- ‘1′ – Listen to messages in currently selected folder. (new or old messages selected when you first connect)
- ‘2′ – Change your current message folder. (’0′ for new messages, ‘1′ for old messages, ‘2′ for work messages, ‘3′ for family messages, ‘4′ for friends messages, ‘#’ to cancel)
- ‘3′ – advanced options (’4′ to place an outgoing call)
- ‘0′ – Mailbox options (record greetings and set PIN number)
- ‘*’ – Help
- ‘#’ – Exit
When listening to messages:
- ‘3′ – advanced options (’1′ – send a reply if a Kiwi Internet user, ‘2′ – call the person who left the message, ‘3′ – listen to the message details, ‘4′ – to place outgoing call)
- ‘4′ – Go back to the previous message
- ‘5′ – Repeat the current message
- ‘6′ – Play the next message
- ‘7′ – Delete the current message
- ‘8′ – Forward the message to another 2talk mailbox
- ‘9′ – Save the message to a folder (’0′ for new messages, ‘1′ for old messages, ‘2′ for work messages, ‘3′ for family messages, ‘4′ for friends messages)
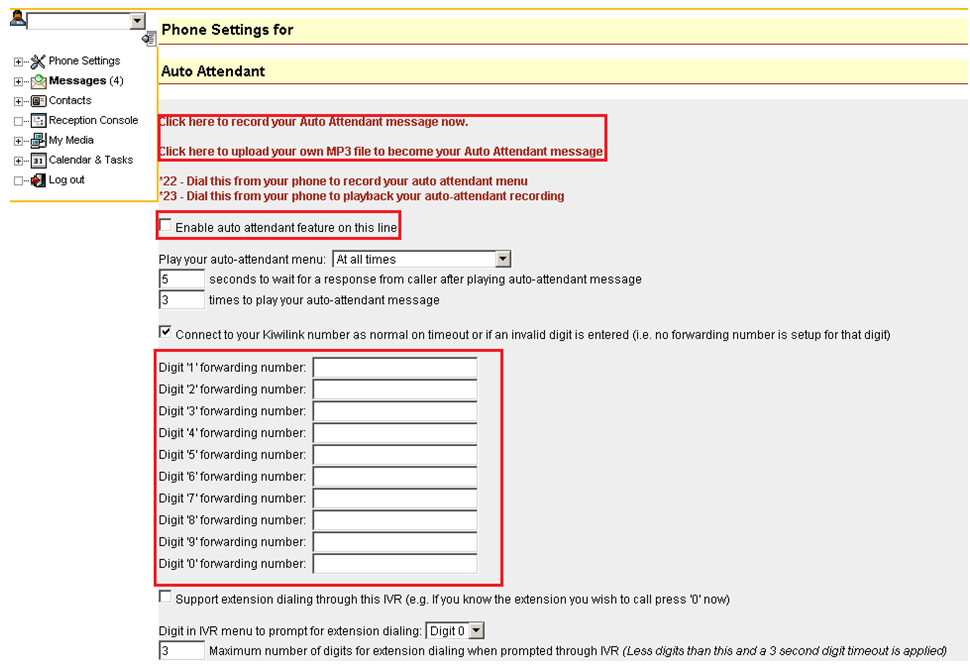
Auto Attendant:
- Click here to record your auto attendant message now: This will bring up a window to enter a phone number. Once you click ok our system will call the number prompting you to record your message. If you have the message already recorded as a .MP3 click below to upload it.
- Enable auto attendant on this line: Click the box to enable to attendant.
- Digit forwarding: Enter the number you want our system to call when a caller selects a particular digit.
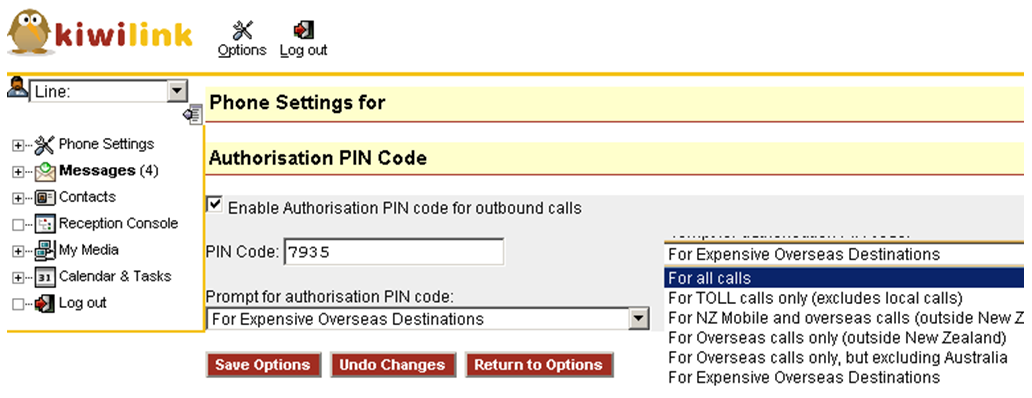
Authorised Pin Code:
- Enable Authorisation Pin Code: Tick the box to enable the Pin.
- Prompt for authorisation PIN code: Select when our system should ask the caller for the PIN.
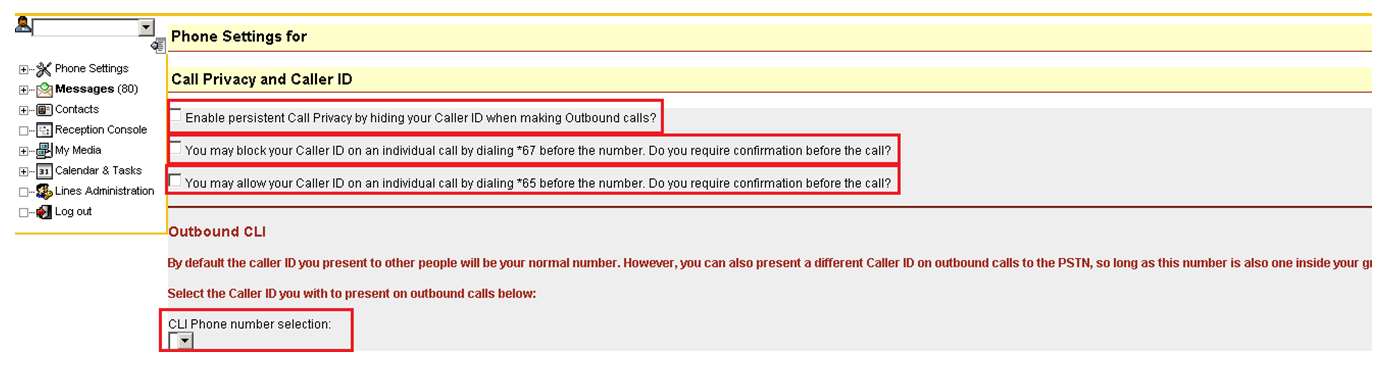
Call Privacy and Caller ID:
- Enable persistent call privacy by hiding your caller ID: This will block your caller ID when calling out.
- You may block your Caller ID on an individual call by dialling *67 before the number: Select this box if you want our system to confirm before initiating the call.
- You may allow your Caller ID on an individual call by dialling *65 before the number: Select this box if you want our system to confirm before initiating the call.
- Outbound CLI: If you wish to use a different number as your caller ID select it from the dropdown box. The number needs to be grouped (we can do this for you). If you want to use a number as the caller ID that is currently with a different provider we will need a copy of an invoice for proof of ownership.